
How I stopped worrying and learned to love emulation
18 Sep 2018UPDATE 2022: This post has now been rewritten for issue 54 of Wireframe magazine and is available here on page 48.
Emulators fancinate me. The idea that you could run a computer within another computer feels like some sort of arcane vodoo magic. Playing Gamecube games on a PC? MegaDrive games on an Xbox 360? Insanity, but awesome nonetheless.
I’ve wanted to dabble in writing my own emulator for a long time but in earlier years I lacked confidence and more recently I just didn’t feel like I had the time. After watching a colleague of mine at Mediatonic write his own working NES emulator from scratch I felt I needed to try again. After, ahem, gentle encouragement from other colleagues I thought what the heck, I’d give it a try.
The next question was…what to emulate? The NES project was quite daunting and I wanted something simpler and compact so I wouldn’t be tempted to give up. It turns out that there is a really good starter project for everybody who wants to try their hand and emulation and it’s called the CHIP-8.
The CHIP-8 was never a real computer but that’s what makes it fascinating. Long before most other games systems it was a virtual machine for 8 bit computers way back in the 1970s. This means there is no real hardware to attempt to emulate and quite a simple specification to implement as the CHIP-8 only has 35 opcodes, one of which is generally ignored anyway as it’s a hardware specific one for the RCA 1802. You still have all the usual problems to solve of loading binary files, parsing opcodes and then running them on virtual hardware but you don’t have the other baggage that comes with trying to write emulators for real hardware. The game was afoot.
Next, I needed to choose some tech to help me build my own version of the CHIP-8. I read tutorials that used C# and C++ but both seemed a bit heavy weight for what I wanted to do and seemed to be platform specific. I wanted something simple that would handle drawing to screen and work on platforms other than a windows PC with a minimum of fuss. The most sensible option stood out from the rest: Pygame.
For simple projects there is no easier way I have found to draw things on your monitor. I was going to find however, that dynamic languages have a few drawbacks when it comes to emulating things like registers and framebuffers. The most obvious problem was that Python has no byte type available by default. Thankfully the NumPy library does define such types, so I decided to use that. It turns out the simplest way to deal with this is a bitmask to restrict integer values to the range of one or two bytes where required.
Next I had to break down and understand the basic CHIP-8 specifications:
- 4K of total memory
- 16 general purpose 8 bit registers (the 16th is also used as a special arithmetic flag at times)
- A 64 pixel wide and 32 pixel high framebuffer
- A stack that stores return addresses for function calls and nothing else
- Some way to store the pressed state of a 16 button keypad (0-F)
- An 8 bit index register
- An 8 bit program counter
- An 8 bit stack pointer
- An 8 bit delay timer register
- An 8 bit sound timer register (when above zero, a beep is made)
This part is pretty simple and was easy to set up. The next step was figuring out how to parse the raw binary from a rom file and turn that into instructions for the CPU. The CHIP-8 has a strange opcode definition in that each opcode is a 16 bit/2 byte value that contains the instruction and the data for that instruction. This would be simple enough were it not for the fact that apart from the first four bits, each following nibble can be part of an instruction or data - depending on the instruction in question. For instance, the opcode 0x00E0 means clear the screen but opcode 0x1234 means jump to address 0x234.
I had to write a parsing system that would map each opcode to a corresponding logical operation. The first part of the problem was how to turn a set of bytes into separate values so that if an opcode contained data, I could get at that data. I could have used binary operators every time but it seemed cleaner to make a class that took in the byte value and exposed the associated nibbles as attributes, like so:
"""
This module defines an opcode class for parsing
raw words into instructions and data
"""

class Opcode:
    """
    This class represents the instructions and data of an opcode
    """

    def __init__(self, word):
        """
        This class takes in a 2 byte value/word and parses the bytes
        to store them in different attributes for later use
        Args:
            word: a 2 byte/16 bit value representing an opcode.
        """

        # We use bitwise AND with a mask to extract specific nibbles.

        # a word should be no more than 16 bits
        self.word = word & 0xFFFF

        # we just want the most significant bits/nibble
        # here so we bitshift right
        self.a = (word & 0xF000) >> 12

        self.nnn = word & 0x0FFF
        self.nn = word & 0x00FF
        self.n = word & 0x000F

        # Where don't use the lower nibbles, bitshift
        # right to get just the raw value
        self.x = (word & 0x0F00) >> 8

        # Eg. we want 0x4 not 0x40
        self.y = (word & 0x00F0) >> 4

    def __str__(self):
        return hex(self.word)
Pretty simple eh? I wish I could take credit for this one but many CHIP-8 emulators solve the problem in a similar way.
The next issue was how to map an opcode to an operation. Most other emulators I had looked at just used a giant switch statement, which seemed inelegant. Some blog posts suggested that function lookups would be a good idea but I felt that would be hard to test and a bit ugly. I decided to write a class for each opcode that would change the state of the (virtual) cpu as required.
I then wrote a mapper class that would take in the raw byte value of an opcode and return the related operation object. It looks like this:
"""
This module defines a class that handles
mapping a 16 bit opcode value to an operation object
"""

from pychip8.operations import *
from pychip8.opcode import Opcode

class OperationMapper():
    """
    This class handles mapping a 16 bit opcode
    value to an operation object
    """

    def __init__(self):
        self._operations = {}

        # opcode 0NNN (call RCA 1802 program) is NOT SUPPORTED!
        self._operations[0x00E0] = ClearDisplay()
        self._operations[0x00EE] = ReturnFromFunction()
        self._operations[0x1] = Goto()
        self._operations[0x2] = CallFunction()
        self._operations[0x3] = SkipIfEqual()

        self._operations[0x4] = SkipIfNotEqual()
        self._operations[0x6] = SetX()
        self._operations[0x7] = AddToX()
        self._operations[0xA] = SetI()
        self._operations[0xB] = GotoPlus()

        self._operations[0xC] = Random()
        self._operations[0xD] = DrawSprite()
        self._operations[0x50] = SkipIfXyEqual()
        self._operations[0x80] = SetXToY()
        self._operations[0x81] = BitwiseOr()

        self._operations[0x82] = BitwiseAnd()
        self._operations[0x83] = BitwiseXor()
        self._operations[0x84] = AddYToX()
        self._operations[0x85] = TakeYFromX()
        self._operations[0x86] = ShiftXRight()

        self._operations[0x87] = TakeXFromY()
        self._operations[0x8E] = ShiftXLeft()
        self._operations[0x90] = SkipIfXyNotEqual()
        self._operations[0xE9E] = SkipIfKeyPressed()
        self._operations[0xEA1] = SkipIfKeyNotPressed()

        self._operations[0xF07] = SetXToDelayTimer()
        self._operations[0xF0A] = WaitForKeyPress()
        self._operations[0xF15] = SetDelayTimer()
        self._operations[0xF18] = SetSoundTimer()
        self._operations[0xF1E] = AddXToI()

        self._operations[0xF29] = LoadCharacterAddress()
        self._operations[0xF33] = SaveXAsBcd()
        self._operations[0xF55] = SaveRegistersZeroToX()
        self._operations[0xF65] = LoadRegistersZeroToX()


    def find_operation(self, word):
        """
        This method takes a 16 bit value representing an
        opcode and returns the related operation
        """

        opcode = Opcode(word)

        # make a key of a + n + n so that 0xA123 becomes 0xA23
        twelve_bit_key = int((opcode.a << 8) + opcode.nn)
        if twelve_bit_key in self._operations:
            return self._operations[twelve_bit_key]

        # make a key of a + n so that 0xA123 becomes 0xA3
        eight_bit_key = int((opcode.a << 4) + opcode.n)
        if eight_bit_key in self._operations:
            return self._operations[eight_bit_key]

        four_bit_key = opcode.a
        if four_bit_key in self._operations:
            return self._operations[four_bit_key]

        raise KeyError(f"Opcode {word:#06x} is invalid")
The trick with this is the parsing that happens in find_operation - I try to find the opcodes with the most nibbles that are identifiers first, then I slowly go through to more simple ones that may only use two nibbles and finally check the ones that are only identified by their leading nibble. If an operation can’t be found I throw an exception. This is important as I spent the early period of the project mostly just writing opcodes with no working emulator to run them on. Instead, I wrote several tests to confirm the opcodes did what they said they did and also that the mapper found the expected operation when given an opcode. I also had tests to make sure that invalid codes that should not map to an operation, didn’t.
Writing the unit tests doubled the time it took to write a class for each operation, but the amount of bugs they caught made them invaluable. They also meant that I could be sure that any change I made did not break the functionality of existing code elsewhere. If you want to write your own CHIP-8 emulator I would very much recommend testing your code in a similar fashion.
Now I had a way to read binary data from roms, a virtual cpu, and working opcodes. What I needed next was a renderer. Writing a simple renderer in pygame that drew an all black screen and then drew white sprites over that was easy enough, but sadly I hadn’t quite implemented the single draw opcode properly. I figured this out by creating a test pattern shown below:
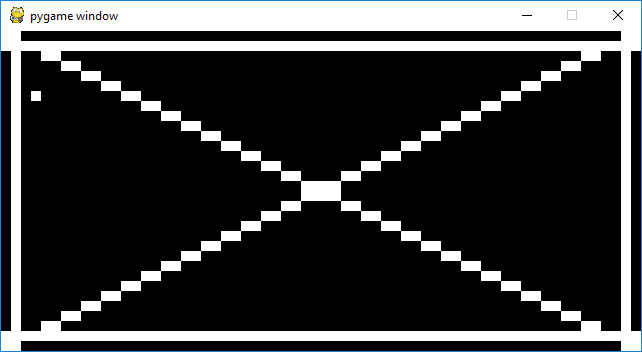
It didn’t look like this at first as I had incorrectly implemented the opcode. Among other things I had used the raw values in the opcode as the “start drawing at x and y co-ordinates” rather than using the values in the registers they pointed to. Yes, the good old forgot to dereference a pointer error. Sigh.
The good news is that by writing the renderer test it was easier to track down the bug and I soon had the emulator partially working. I found a useful test ROM to confirm that the emulator was working correctly (you can see the documentation for it here) but I was getting strange output like shown below:
I was scratching my head for a while but after looking at the documentation I could see which opcodes were failing but I wasn’t sure why. To fix this, I had to take a step back and write my own debugger that allowed me to run the program step by step and print all the register values on screen so I could see where things were going wrong. It looks like this:
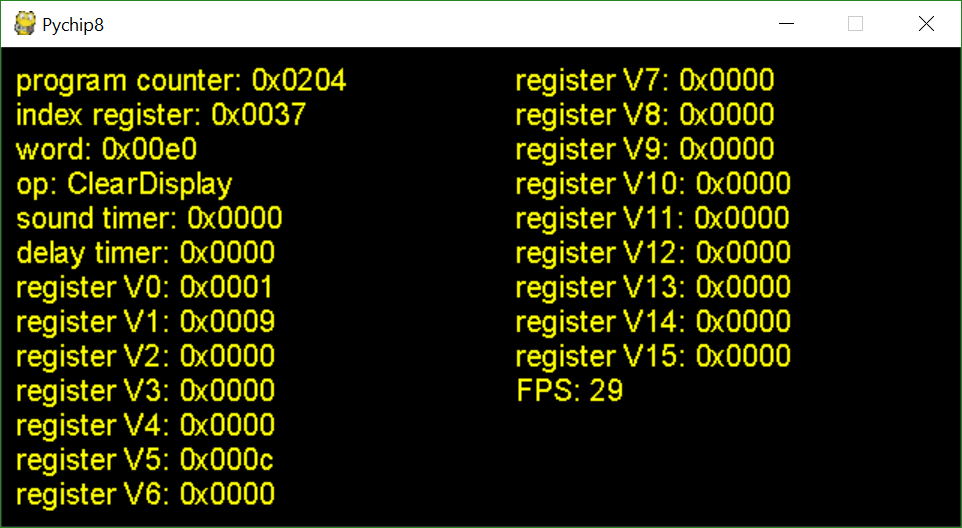
It took a little time to figure out the simplest way to write a debugger and implement it but it was more than worth the effort. Like my unit tests and the test rom, I consider the debugger a crucial part of building the emulator and it sped fixing errors up immeasurably.
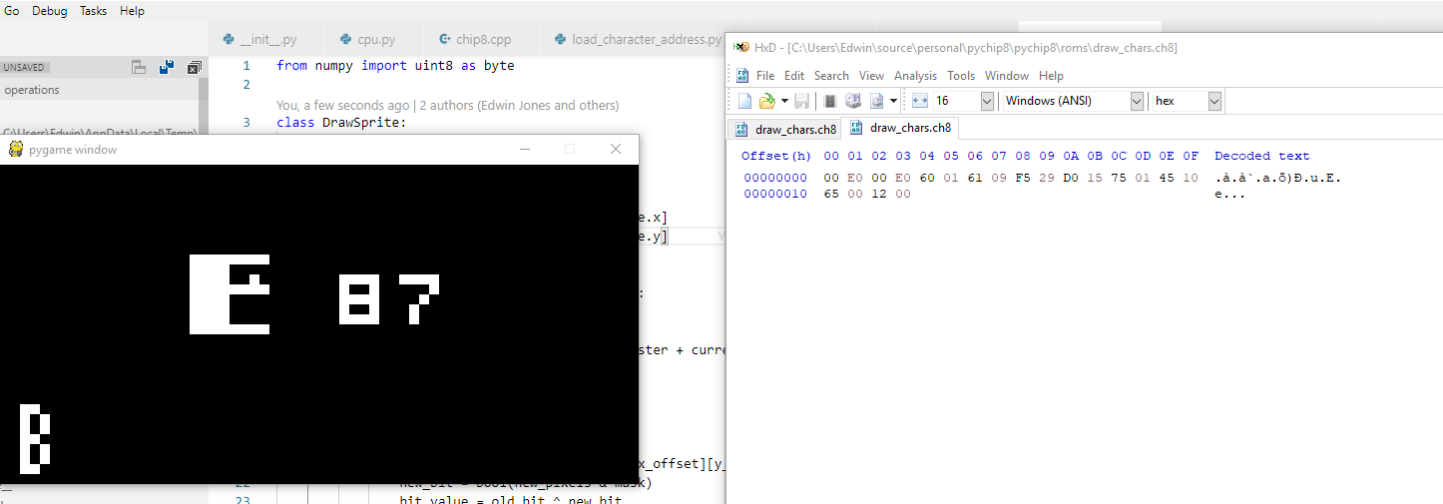
After stepping through each error the test rom threw up I found that the basic font of the CHIP-8 wasn’t working. I hand crafted a fresh test rom byte by byte with a hex editor to print each character stored in the font, then used my debugger to loop through it. It turned out my font loading code was broken and looking at the wrong addresses. Once this was fixed, the test ROM started working. It’s hard to explain how happy just seeing this made me:
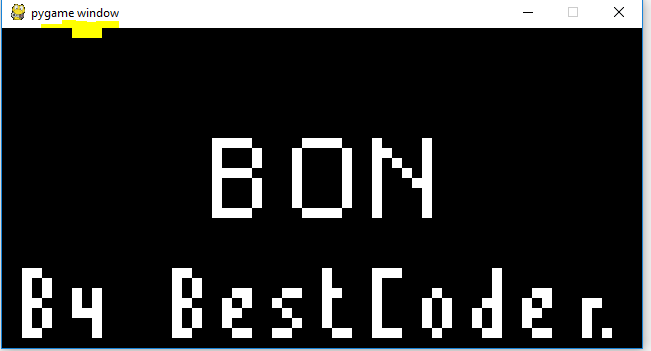
It’s silly, but it meant the emulator was mostly working! In my excitement I immediately booted up a full phat game (space invaders) and was overjoyed to see the awesome title screen run.
Sadly, in my haste I hadn’t actually implemented input or sound yet so I couldn’t move any further than the menu screen. I was also confused as the screen appeared to flicker slightly. This was due to me running my emulator far too slowly (a CHIP-8 runs best at roughly ~500hz and I was running it at 60hz) and the drawing operation being rather slow to begin with. I looked up some footage of other CHIP-8 emulators and when I saw the same oddness I breathed a sigh of relief.
Input was slightly more complicated so I ended up just using the existing pygame api to handle that. Once I put it all together I could finally play space invaders and other CHIP-8 games like pong and tetris. Old and well known they may be but there was something very novel about playing them on a system I had crafted for myself. For reference, this is how my emulator looks playing pong:

I showed off my project to a few people at work and they were pretty awesome in providing feedback and genuine interest. The only downside is they are now egging me on to build a game boy emulator which I am seriously considering doing if I can find the time.
Building this emulator might seem like a simple enough task but it’s one of the biggest projects I’ve done outside of my day job for a long time and was good fun. I had to spend some time planning and reading before coding so I felt this was a nice way to stretch my engineering legs. If you’re interested in emulation even a little bit I would recommend this as a fun project to learn the basics. You can find the source code for my emulator on github.