Jekyll2024-06-28T15:51:34+00:00https://edwinjones.me.uk/feed.xmlEdwin JonesMy personal website & blogSteam Powered - Make your own Linux based gaming console2023-09-22T00:00:00+00:002023-09-22T00:00:00+00:00https://edwinjones.me.uk/steam-poweredI’ve been mulling moving over to Linux full time for personal gaming use for quite a few years but since I got my Steam Deck
last year, I’ve realised it’s perfectly viable now thanks to Proton. Problem is, the Steam Deck isn’t quite powerful enough for my 4K
TV in the living room and Valve don’t actually release a desktop version of SteamOS
anymore. After a bit of
searching I found that most of the popular mainstream desktop distros like Ubuntu LTS are months to years behind
the latest driver updates needed to run most games on launch and as such aren’t always the best choice either.
This left me with a few options:
Build my own Arch Linux install with blackjack and hookers the latest updates.
Use a gaming distro like HoloISO or ChimeraOS.
Use a rolling distribution like Manjaro or openSUSE Tumbleweed to take the heavy lifting away.
I opted out of option one as it seemed like a time sink. I did indeed try option 2 for a while but I chose
ChimeraOS
over HoloISO
as it A) predates the Steam Deck/modern SteamOS incarnations and B) is more regularly updated than
HoloISO. This worked pretty well for a while until Resident Evil 4 hit and I got the wonderful black square issue:
Urgh. That was actually caused by
an issue with Mesa that required
an update. Neither Valve or the Chimera OS team released this for a little while but
as soon as I upgraded, I ended up getting this bug and could
only boot into a black screen. I chatted to the devs on their discord and they were super friendly but they couldn’t
figure out my issue and I gave up.
NB I did try manually updating Mesa before upgrading but on an immutable OS like ChimeraOS this is difficult and such changes are often overwritten during updates anyway.
So I finally had installed a Linux distro that could run my games well without issue but how could I make this more console like? The first thing I did was set Steam up to boot
into “Big Picture” mode.
This has had a revamp and is now much more like the Steam Deck gaming mode layout but misses a few
things - you don’t get MangoHud out of the box for instance.
Once I had that, I needed to make sure I could use the PC without getting up off the sofa. I updated the firmware on
my Xbox controller
and Xbox wireless headset then connected them manually via bluetooth. I then configured
Wake on Lan
so the PC could be remotely activated as long as it had a wired ethernet connection. I use an iPhone app called
“Wake me up” to
send the magic wake up packet to my network broadcast address
which works like charm.
I then manually installed MangoHud and used GOverlay
to globally enable it but set it to hide by default. I set
the “toggle” key to F1. I then configured Steam to change the share button on my Xbox controller to actually send
and F1 key press and voila, a basic Steam Deck like performance overlay feature is bodged into my configuration. This is
useful when tweaking settings to get the best performance as my RX 6700 GPU isn’t quite good enough for 4k at max
settings for most new games.
I was mostly there and switching between my homebrew console and the Steam Deck without issue via Steam Cloud but I
suddenly noticed something odd - sometimes some games would crash to the Steam UI without warning but not on the Steam Deck,
only my desktop PC. After a bit of reading I realised that I had to boost the
vm.max_map_count setting manually to make sure gaming processes
didn’t crash when trying to use more memory maps than expected. This solved the problem and made me feel chuffed that I
had fixed it myself without giving up again and hopping to a new distro.
I was almost there. The final problem was anytime I wanted to run updates or configure anything non gaming related I had to
plug in a keyboard and sit by my TV which was annoying. The solution was simple:
VNC! I used Remmina
as a client from my Ubuntu laptop. I did have to manually add a firewall exception for VNC via
YaST which is an openSUSE tool I’d never used before but after that everything just
worked. I’ve not needed to plug anything directly into the PC since; It just sits on the floor by the TV without
a care in the world other than the odd dust cleaning session now and then.
Finally, I had it - a working Linux gaming console that gets some updates faster than
a Steam Deck does. I’ve had no compatibility issues with it either as anything the Steam Deck can run will run here as well.
The joy of Linux means hardware upgrades are simply plug and play as long as my kernel is up to date. With openSUSE tumbleweed
this is a given as long as I remember to apply the updates themselves now and then.
Would I recommend this for everybody? No. Is it perfect? Far from it, I’d prefer a real desktop Steam OS release from
Valve, but I think we all know not to wait for Valve to do things if they haven’t announced them fully by this point.
I don’t have the same ability to lock the framerate or set scaling options as you do on a Steam Deck due to not using
gamescope.
My MangoHud hack works but isn’t easily configurable while in a game like it is on a deck. Sometimes I
get bugs that just don’t happen on the deck because I’m using an entirely different distro although like a deck I can
“roll back” to an earlier snapshot should I need to.
All that aside, if you like your Steam Deck but want to game on something a bit beefier with a discrete card without leaving the Linux
ecosystem I can heavily recommend this approach. I hope this helps you find a new way to play your PC games. The
best part? All of this software is 100% free and most of it is open source. The year of the linux desktop is finally
here - sort of.
]]>Games Boy - Write your own Game Boy games in C2022-05-24T00:00:00+00:002022-05-24T00:00:00+00:00https://edwinjones.me.uk/games-boyThe game boy was my first personal home console back in the early 90s and perhaps the console that cemented my
love of games in general. I’ve always dreamed of writing a game for it
and now it seems I (sort of) have.
I’ve been playing around with the GBDK for a while now and have managed to summarise my learnings in an article
for Wireframe magazine. You can find the first part here in issue 62 and the second here in issue 63. Both parts start on page 50 of their respective issues.
I’d like to add to the article with a little personal special thanks section. All these people and more helped me build
what I hope is an interesting and informative read for you:
Ryan Lambie for being an amazing person and editor.
The GB dev community in general for countless amazing tools like GBDK, sprite editors etc.
]]>SSH Agent Man - How does SSH agent work?2022-02-18T00:00:00+00:002022-02-18T00:00:00+00:00https://edwinjones.me.uk/ssh-agent-manI’ve been using SSH for quite a while now and have used SSH keys regularly to authenticate myself with
a variety of systems both at work and at home. I historically have been a bit lazy and avoided using passwords
for my private keys to avoid having to remember said password and type it in every time. Eventually I learned
of SSH Agent - a tool that allows you to type your SSH password in once per session to save on repetitive password entry by storing the decrypted value of the key in memory for easy access.
Generally wherever I’ve installed SSH agent I tend to use some fire and forget scripts so I don’t actually follow along or remember exactly how it works, just what it does. That changed recently at work as I’ve been trying to use Powershell more at work on WSL2 so script snippets I learn and share around are more user friendly for my colleagues and friends on Windows systems. This lead to a bit of a snag as it didn’t have an obvious way to make SSH Agent work and I couldn’t figure out why. As I didn’t know of any simple tools to
get things running I put my detective hat on and went to work.
My first step was to compare the environments of my usual daily driver shell, fish and Powershell to see if I was missing anything obvious and it turns out I was - my powershell sessions were missing two crucial environment variables my fish shell had: $SSH_AUTH_SOCK and $SSH_AGENT_PID. If I added
these variables to my $PROFILE file and started a new session everything worked normally. Without them I was still having to add my password in every time I wanted to use my SSH key. Stranger still, when I rebooted my system and went straight into a powershell session I was right back where I started and had to enter my password every time. I also noticed that when I kicked off a new fish shell session that the values of both these environment variables had changed.
I floundered a bit at first and tried to see if manually running ssh-agent would fix things - instead I just saw some strange output in the terminal. I did however notice that a new ssh agent process had started and things began to click a little. My next step was to look deeper into my fish configuration to see if I could figure out exactly what it was doing. Here I found out I’d installed fish_ssh_agent and noticed it had easily accessible source code so I took a look at exactly what it was doing:
function __ssh_agent_is_started -d "check if ssh agent is already started"
   if begin; test -f $SSH_ENV; and test -z "$SSH_AGENT_PID"; end
      source $SSH_ENV > /dev/null
   end

   if test -z "$SSH_AGENT_PID"
      return 1
   end

   ps -ef | grep $SSH_AGENT_PID | grep -v grep | grep -q ssh-agent
   #pgrep ssh-agent
   return $status
end


function __ssh_agent_start -d "start a new ssh agent"
   ssh-agent -c | sed 's/^echo/#echo/' > $SSH_ENV
   chmod 600 $SSH_ENV
   source $SSH_ENV > /dev/null
   true  # suppress errors from setenv, i.e. set -gx
end


function fish_ssh_agent --description "Start ssh-agent if not started yet, or uses already started ssh-agent."
   if test -z "$SSH_ENV"
      set -xg SSH_ENV $HOME/.ssh/environment
   end

   if not __ssh_agent_is_started
      __ssh_agent_start
   end
end
It was a bit hard to parse at first but I could tell that it was checking if ssh-agent had been run and if not, starting it and storing the terminal output of the command in the environment variables I mentioned earlier. I couldn’t quite understand exactly what it was doing in a few places - what was $SSH_ENV? Why was it passing the -c flag to ssh-agent? It turns out both had simple answers. $SSH_ENV was resolving to /home/username/.ssh/environment - a simple text file. The script was invoking ssh-agent with the -c flag to force output to print in a simpler manner which according to the man page means to Generate C-shell commands on stdout. I wasn’t entirely sure what this meant but I could see that the output went from something like:
Finally, I noticed it was using sed to comment out the echo command that would otherwise print the process id of the running instance of ssh agent to the screen each time that part of the script ran.
I was almost there, but I couldn’t quite figure out how fish was taking this output and using it. I finally twigged that it was sourcing the environment text file as script, exporting those environment variables to the current session.
It all made sense. The script was using the environment file to check if it had been run before. If it had it checked to see if the process id recorded in the script was currently in use. If it wasn’t it ran ssh-agent and exported the output to the current session. If was, it exported the existing variables in the file. This meant that anything trying to use ssh agent in a shell session could know what socket ssh-agent was already listening to and communicate with it. This would allow use of the decrypted ssh key any time it was required.
I was almost there. The next step was to make it work in powershell where bash style commands don’t always work. I took the brute force approach of rewriting the script and sticking it into my $PROFILE file like so:
# Stick this in your "$profile" file.
# Rough explanation of ssh-agent output here: http://blog.joncairns.com/2013/12/understanding-ssh-agent-and-ssh-add/
# Note, https://github.com/ivakyb/fish_ssh_agent/blob/master/functions/fish_ssh_agent.fish takes a similar approach.

# Resolve SSH agent details by starting ssh-agent if it's not already running
# and storing current run details in $HOME/.ssh/environment
$environmentfile = "$HOME/.ssh/environment"
if(Test-Path -path $environmentfile -pathtype leaf)
{
  Write-Output "ssh agent file exists"
}
else
{
  Write-Output "creating ssh agent file"
  ssh-agent -c | Select-Object -first 2 | Out-File $environmentfile
}

$sshdetails = Get-Content $environmentFile
$env:SSH_AUTH_SOCK = $sshdetails[0].split(' ')[-1].split(';')[0]
$env:SSH_AGENT_PID = $sshdetails[1] -replace "[^0-9]" , ''

if(-not (Get-Process -id $env:SSH_AGENT_PID -ea silentlycontinue))
{
  Write-Output "updating ssh agent file"
  ssh-agent -c | Select-Object -first 2 | Out-File $environmentfile
  $sshdetails = Get-Content $environmentfile
  $env:SSH_AUTH_SOCK = $sshdetails[0].split(' ')[-1].split(';')[0]
  $env:SSH_AGENT_PID = $sshdetails[1] -replace "[^0-9]" , ''
}
Hopefully you can see the script is doing mostly the same as the fish equivalent but with a few extra steps. To get the socket value I split the first line of the ssh agent output to find the right token. To find the process id I just use a regex to strip out everything on the second line that’s not a number. I only take the first two lines of the output so I don’t need to do anything funky with sed to comment out the echo command.
I restarted my computer to be sure nothing was hanging over from previous sessions and loaded up a new terminal. I tried to run an ssh command and entered the key when prompted. I then ran the same command a second time and it worked as expected. I then opened a new terminal instance and ran the same command a third time with complete success. I was quite pleased I’d managed to solve my problem with a little digging and didn’t need to switch away from powershell to enjoy using the utility of ssh agent.
I hope this helps you - I find knowing what your tools are doing under the hood lets you adapt them for other usages and workflows like I have here. Learning a bit about ssh-agent means I get to keep using powershell where I want to and now have the tools I need to solve any related problems in the future.
]]>Cleaning up my site2021-06-02T00:00:00+00:002021-06-02T00:00:00+00:00https://edwinjones.me.uk/cleaning-up-my-siteSince I started my own blog around 10 years ago to learn HTML and web tech in general, a lot has changed. I originally relied heavily on external tech such as facebook comments, google analytics and disqus to host comments and track activity on my page. Sadly, things haven’t exactly gone well in terms of privacy on the internet for a variety of reasons and I think it’s time to clean this page up.
Therefore as of right now this page is free of all trackers, social media widgets and ad tech I don’t directly need to keep this site running. I’m still using github pages for hosting, youtube for video storage and AWS as a domain registrar so I can’t guarantee this site is entirely tracker free but I’ll endeavour to keep this page as clean as I can going forward.
Most of the web is full of pop ups, adverts and other annoyances that make the experience less pleasant than it could be. I can’t fix those problems at scale but I can at least try to make people feel more at ease on my site. I hope in some small way this helps.
I’ll work towards removing more trackers as and when I can find replacement tech. If you find something you think should be removed, please send me a message at .
]]>Make your own Raspberry Pi webcam2020-08-26T00:00:00+00:002020-08-26T00:00:00+00:00https://edwinjones.me.uk/make-your-own-raspberry-pi-webcam2020 has been an interesting year to say the least, but one of the oddest side effects of coronavirus is the fact that USB webcams
have been much harder to come by and generally cost a lot more than they used to.
The oft lauded Logitech c920 goes for the best part of £100 if not more,
and that’s if you can find one in stock.
I had the idea a few months ago that I could probably jury-rig a Raspberry Pi Zero
with a camera module to be a USB webcam but I didn’t know enough about how to configure one
to make it work. I was following this thread on the official forums but
it seemed that people far smarter than me weren’t having any luck, so I gave up for the meanwhile.
Recently I came across a post by David Hunt
that made my heart skip a beat - he’d cracked the remaining steps and created a detailed post about how to configure everything.
I realised that this probably wouldn’t work if I needed to quickly unplug the Pi as power cuts can cause SD card corruption - then I remembered that you can configure the Pi to have a read only operating system.
As this would only be plugged in via USB without any network access, I wouldn’t need OS or software updates!
I’d done this years before but long since forgotten how,
thankfully another post by Andreas Schallwig
had me covered with a detailed guide for the latest version of the Raspberry Pi OS, Buster.
I followed both guides and added some customisations of my own to turn off the wifi of my Pi.
I couldn’t quite figure out why the image appeared blurry at this stage. Turns out yet another blogger had me covered - Jeff Gerling’s post about the camera
explained what was wrong and more importantly that you can manually focus a v2 camera with some tweezers!
One awkward and fiddly step later this was the result:
Impressive no? David’s configuration sets up the camera to act as a generic UVC 1080p/30fps webcam that should work on most desktop operating systems. I set mine up on Pop OS and it worked just fine.
It looks significantly better than my laptop camera at 720p and matches the spec of the c920 I mentioned earlier.
Considering the c920 costs so much, I saw this as a significant win.
If you want to try this out yourself, you’ll need the following parts:
Something to hold the Pi with so the camera can aim at your face.
A computer to flash the micro SD card and use SSH with.
Assuming you already have a computer, the cost of all of the above is only around £45. If you have any of the parts already you’ll save even more.
Who needs a £100 webcam? David uses the Pi HQ camera but
this is overkill for a webcam and costs a lot more than the v2.
The Pi Camera V1 should also work but those are no longer in production so I couldn’t verify this myself.
To get started, you’ll need to download the latest version of the Raspberry Pi OS and flash it onto your SD card.
The easiest way to do this I’ve found is to use the official Raspberry Pi Imager tool
and choose Rasbian Lite as the OS image - we’re not going to be using a desktop on our webcam!
Once you’ve flashed the SD card you need to open up the boot partition in your file explorer and add two files.
Add one called ssh with no file extension - we’ll need this to enable SSH access for later. Add a second one called wpa_supplicant.conf
and give it the following content:
You can change the country code if you live outside of the UK - acceptable values are us, de, fr etc. depending on your country.
Plug your SD card into your Pi and attach the v2 Camera inside of the case.
There’s a handy guide here if you’ve never done this before.
Connect a micro USB cable to the Pi’s USB data port and plug it into your PC. The data port is the one in the middle,
not the one near the edge of the board. Once assembled you should have something that looks similar to mine, which is currently mounted on my monitor stand:
Give it a minute or so to boot up. We should now be able to see our Pi on the local network.
There’s a few ways to do this but I’ve found it best to use the official guide to find the correct
IP address.
Once we have this we can remote into the Pi via SSH with the default username of pi
and the password of raspberry.
Once we’re at the command line, we’re ready to set the camera up as a
USB gadget via David’s guide. A major problem I had was that I tried to edit only the /boot/cmdline.txt file by adding modules-load=dwc2,libcomposite at the
end of the console line. You must make changes to the config file as well and it’s easy to miss this in the guide. Add these lines
to the bottom of the /boot/config.txt file:
# Enable usb gadget mode
dtoverlay=dwc2
Once you’ve run through the above, you can reboot the Pi and start accessing the system via TTY over USB.
If you’re comfortable doing this and want to disable wifi for security, add the following lines to end of the /boot/config.txt file,
under the dtoverlay=dwc2 line:
# Disable wifi and bluetooth (we use TTY connections over usb)
dtoverlay=pi3-disable-wifi
dtoverlay=pi3-disable-bt
This is completely optional and if you’d rather just use wifi, that’s fine as well! If you do want to do it and you’re using Linux make sure to add yourself to the dialout and tty groups as I couldn’t connect without doing this first.
We should now be able to see the raspberry pi show up as a webcam now in a variety of applications.
If you can’t see yours you might want to double check you’ve done all the steps above.
You can adjust the camera brightness, contrast and rotation by adding these lines to your /etc/rc.local file,
just above the exit 0 line:
# set camera settings
v4l2-ctl -c brightness=(0-100, pick a number! Starts at 50)
v4l2-ctl -c contrast=(0-100, pick a number! Starts at 20)
v4l2-ctl -c horizontal_flip=(1 or 0, 1 is on 0 is off)
v4l2-ctl -c vertical_flip=(1 or 0, 1 is on 0 is off)
If the camera appears fuzzy remember you can manually focus the lens with a pair of tweezers as demonstrated
in this video.
You will probably see a little noise in the image but this is normal for the Pi camera V1/V2 as their sensors can be a slightly noisy in certain situations.
Once you’re happy with the video quality, it’s time to set the Pi into read only mode so we can switch off our PC whenever and
not have to worry about corrupting the SD card. Follow Andreas’ guide here then reboot your Pi.
Once the Pi comes back online you’re ready to show your friends and co-workers your webcam
that cost a fraction of what theirs did and is likely better. Congratulations!
]]>Powerful Powershell Passwords2020-07-27T00:00:00+00:002020-07-27T00:00:00+00:00https://edwinjones.me.uk/powerful-powershell-passwordsTl;dr - For all of you doing some googling to find out how to make a secure password with any modern powershell version (i.e. Powershell 5 and above) the code snippet you want is at the bottom of this article.
We’ve all been there - we’ve got a new website to sign up for or some credentials to generate for a work account. For most people a password manager is a viable option for generating secure passwords but in many cases you want to automate this flow - ideally in a way that will work on any given platform. Many people work with windows as their OS but others use Mac OS or a variety of linux. While there are a variety of approaches for each, most people I expect would prefer something simple that would work on all of them. I’ve recently spent some time searching for a good solution for this myself but as I couldn’t find one easily I’ve written this article in the hopes of sparing somebody else the time it took me to come to these conclusions.
Powershell has made leaps and bounds since it originally started as a windows only scripting language. It now runs on all your favourite desktop operating systems and makes a perfect candidate for finding a simple command that the majority of people can just run without installing anything else. The old way to generate a password in powershell is as follows:
This works by using a static method we borrow from C# to generate a password of the given length. It’s the top find on most “generate a password in powershell” searches and still works to this day on Windows. Sadly, System.Web.Security.Membershipis not available outside of windows. Ideally, we want a solution that will work on any operating system you end up using so we need to keep searching.
Google fu can take us some interesting places, usually with multi line scripts that are hard to confirm are crytopgraphically sound. The smallest gist I’ve found so far is this one. It looks pretty promising, but ideally I think we’d all like to use a one liner we can easily share with our peers. Looking at the code in that gist, we can take one line of it and use that:
This works and generates something that looks correct but…what on earth is that code doing? It’s actually pretty simple - it’s putting the ASCII characters a-z, A-Z and 0-9 into a set, selecting a random character from that set 32 times and dumping that out on your console. Good luck remembering that in a few months let alone editing that command without breaking it. What if we simplified it a bit with:
That’s much easier to understand right? The best part of this approach is it’s obvious to anybody new what’s going on and we can easily customise the alphabet used for the random passwords. We could remove numbers entirely or add different characters etc.
As for the Get-Random cmdlet, how can we be sure it’s actually secure? Via the documentation! Reading the documentation tells us that as long as we do not set a manual seed the RandomNumberGenerator class is used and that’s cryptographically secure. If you’re still unconvinced you can check the source code itself to confirm what is going on under the hood.
I hope this helps you generate passwords and api keys more easily during your day to day workflows - please let me know if this is of use to you!
]]>Write your own browser extension2019-12-04T00:00:00+00:002019-12-04T00:00:00+00:00https://edwinjones.me.uk/write-your-own-browser-extensionIn my day to day work I’m often reading a lot of database records that are sorted by time, usually using unix timestamps. The problem I usually have with this is when I view these records via some sort of web portal the numbers are a bit meaningless - I can’t tell by eye if 1575468821 is an older date than 1575598821 without a little reading. Realising that I could do with a tool that automatically converted these for me I decided to bite the bullet and write a simple extension called stampy for Chrome (and Firefox). It turns out writing one is easy and this post details how I wrote mine.
A chrome extension at heart consists of a folder that contains a JSON file and one to many JavaScript files. The JSON file is known as the manifest and just contains some details about your application such as its name, description, version number and which JavaScript files the extension uses. These broadly fall into two categories, background scripts and content scripts.
Content scripts are similar to website scripts you may have written before and can read or modify the contents of a page as you’d expect. They are basically standard JavaScript with the proviso that what you have access to may be controlled by the permissions you’ve configured your extension to have in the manifest.
Background scripts are more interesting, these represent the “host” of your extension. This is the place you would write code to hook into browser events such as somebody opening a new tab or clicking your extension’s button. You can think of these as contexts that run inside the browser itself, extending how it functions. In my extension I use a background script to listen for any events that occur when somebody clicks the extension’s button and then invoke a custom content script on the currently active browse tab with the following short snippet of code:
As you can see, the chrome object and its associated APIs are not what you would normally be able to access inside of a JavaScript browser context or console. This is the place where you can glue together the internal workings of a web browser with custom logic to change how your browser works. For reference, this is what content.js looks like:
// use an anon function to avoid polluting the environment after the script is run(function(){console.info("stampy - running unix timestamp conversion for page");consttimerName="stampy - document body parsing took";console.time(timerName);functionreplaceTimestamp(value){letdate=newDate(value*1000);letlocale=window.navigator.language;letreplacement=`${date.toLocaleDateString(locale)} @ ${date.toLocaleTimeString(locale)} (UTC)`;returnreplacement;}functionfilterInvalidTextNodes(node){// invisible elements should not be considered for timestamp conversionif(node.parentElement.style.display==='none'){returnNodeFilter.FILTER_SKIP;}returnNodeFilter.FILTER_ACCEPT;}consttimestampRegex=RegExp("[0-9]{10}");constnodeIterator=document.createNodeIterator(document.body,NodeFilter.SHOW_TEXT,filterInvalidTextNodes);letnode;while(node=nodeIterator.nextNode()){node.textContent=node.textContent.replace(timestampRegex,replaceTimestamp);}console.timeEnd(timerName);console.info("stampy - timestamp conversion completed");})();
The basic flow of the script is basically that I search through all the text nodes of the page that are children of visible html elements (so I don’t risk modifying script or style elements) and check to see if they contain a certain timestamp-eske pattern with a regex. This pattern is 10 consecutive numerical digits which usually represents a unix timestamp between 2001 and 2286. I feel this is a broad enough range to be useful and a fair enough concession to make to avoid accidentally converting every number on a page. Any strings that match this pattern are then replaced with a string representation of the associated date and time in UTC, the formatting of which is controlled by the user’s locale settings for their browser. I invoke this all via an IIFE so I don’t pollute the environment for any other running scripts.
Once I’d tried this out via chrome’s development tools all I had to do was log in to the chrome developer dashboard and register it by uploading a zip file containing the source code. There was a small sign up fee of $5 but other than that it was trivial to get my extension published.
I wondered how hard it would be to convert the extension to Firefox but I really should not have. Not only does Firefox support most of the chrome extension apis, Mozilla don’t charge to publish an extension! It was even less work to get my extension published for Firefox than it was for Chrome.
All in all it was good fun and quite educational to write my own browser extension. The source code is available on GitHub. If you’re interested in writing your own I’d recommend using google’s free developer guide and go from there. Who knows what you might come up with?
]]>Python Packaging is in a Pickle2019-10-26T00:00:00+00:002019-10-26T00:00:00+00:00https://edwinjones.me.uk/python-packaging-is-in-a-pickleThis post is my attempt to summarize my learnings about the basics of how to manage python packages with different tools and commands. I’ve spent a while collecting this information, hopefully it helps a few people searching for the same thing via google too.
The tl;dr of this post is: Python packaging is a bit of a mess.
The three most popular solutions I have found for managing python packages are as follows:
Pip
Pip is the default way to install modules in python and one you’ve probably used before as it comes by default in most modern installations. The basic usage of pip is along the lines of pip install {module name}. The main issue with pip is that it installs globally and not locally inside of the folder you invoked the command from like say, npm. This means you can encounter dependency problems where two packages need different versions of the same package but as it’s installed globally, you end up in a bit of a pickle.
A requirements file can be used with pip for loose requirements, such as “I need some version of pygame” and is used by pip. It tends to be used as a dev requirements file that is shared between developers of a package. You can simply create a file named requirements.txt in the directory of your choosing with content like so:
BeautifulSoup==3.2.0
Django==1.3
Fabric==1.2.0
Then install those requirements (again, globally) with the pip install -r requirements.txt command.
Another way to share pip dependencies is with a setup.py file. This is a more involved requirements installation mechanism and is required to deploy a python module to the python package index. This is the place you’d want to put your python code if you wanted other people to be able to pip install it. setup.py is what actually gets used to install requirements whenever you run pip install {module name}. Both this and requirement.txt files tend to get used in a python project so developers can install dependencies slightly differently to how end users do.
Venv
Venv allows you to create virtual environments and works around the global pip install issues by creating an environment inside a directory that you can install packages directly into. It can be a bit unwieldy however. It comes with modern python installations by default. You can run it with the following command: python -m venv {folder path}. To exit a running venv session you can usually just use the deactivate command.
Pipenv
Pipenv is an abstraction layer around venv and uses it and pip under the hood to extend pip. Instead of pip install you’d run pipenv install etc. It installs the dependencies to a folder inside your user directory. It greatly simplifies things at the cost of abstraction as you are less involved with how venv is being invoked. One thing to note is that while venv and pip are usually included with python, pipenv is not! Pipenv has richer package metadata and dependency tree data than a requirements.txt file. It is good at installing dev dependencies as well as your main dependencies. You can consider using it to be similar to npm install in a way.
Summary
The reason there isn’t one single default tool to manage python packaging appears to be because python is a mature, open source language. It does not have direct oversight from a single large corporation like Microsoft has over C# or Google has over Go. Several groups have developed different methods to try to solve the packaging problem but there is no one single accepted way of doing things.
I myself prefer just to use pip with a requirements.txt file if required but it’s probably worth looking to venv at the very least if you have a large deployment environment to manage.
PS: To turn python applications into exes/binaries, use the pyinstaller module. It’s very easy to make binaries from tons of python code, even for windowed apps! This means you can avoid all the pain described above if your deployment environment allows you to share and run binaries. It does bundle the entire python runtime alongside your package, so it might not be the most efficient solution depending on your use case.
]]>How I stopped worrying and learned to love emulation2018-09-18T00:00:00+00:002018-09-18T00:00:00+00:00https://edwinjones.me.uk/how-I-stopped-worrying-and-learned-to-love-emulationUPDATE 2022: This post has now been rewritten for issue 54 of Wireframe magazine and is available here on page 48.
I’ve wanted to dabble in writing my own emulator for a long time but in earlier years I lacked confidence and more recently I just didn’t feel like I had the time. After watching a colleague of mine at Mediatonic write his own working NES emulator from scratch I felt I needed to try again. After, ahem, gentle encouragement from other colleagues I thought what the heck, I’d give it a try.
The next question was…what to emulate? The NES project was quite daunting and I wanted something simpler and compact so I wouldn’t be tempted to give up. It turns out that there is a really good starter project for everybody who wants to try their hand and emulation and it’s called the CHIP-8.
The CHIP-8 was never a real computer but that’s what makes it fascinating. Long before most other games systems it was a virtual machine for 8 bit computers way back in the 1970s. This means there is no real hardware to attempt to emulate and quite a simple specification to implement as the CHIP-8 only has 35 opcodes, one of which is generally ignored anyway as it’s a hardware specific one for the RCA 1802. You still have all the usual problems to solve of loading binary files, parsing opcodes and then running them on virtual hardware but you don’t have the other baggage that comes with trying to write emulators for real hardware. The game was afoot.
Next, I needed to choose some tech to help me build my own version of the CHIP-8. I read tutorials that used C# and C++ but both seemed a bit heavy weight for what I wanted to do and seemed to be platform specific. I wanted something simple that would handle drawing to screen and work on platforms other than a windows PC with a minimum of fuss. The most sensible option stood out from the rest: Pygame.
For simple projects there is no easier way I have found to draw things on your monitor. I was going to find however, that dynamic languages have a few drawbacks when it comes to emulating things like registers and framebuffers. The most obvious problem was that Python has no byte type available by default. Thankfully the NumPy library does define such types, so I decided to use that.It turns out the simplest way to deal with this is a bitmask to restrict integer values to the range of one or two bytes where required.
Next I had to break down and understand the basic CHIP-8 specifications:
4K of total memory
16 general purpose 8 bit registers (the 16th is also used as a special arithmetic flag at times)
A 64 pixel wide and 32 pixel high framebuffer
A stack that stores return addresses for function calls and nothing else
Some way to store the pressed state of a 16 button keypad (0-F)
An 8 bit index register
An 8 bit program counter
An 8 bit stack pointer
An 8 bit delay timer register
An 8 bit sound timer register (when above zero, a beep is made)
This part is pretty simple and was easy to set up. The next step was figuring out how to parse the raw binary from a rom file and turn that into instructions for the CPU. The CHIP-8 has a strange opcode definition in that each opcode is a 16 bit/2 byte value that contains the instruction and the data for that instruction. This would be simple enough were it not for the fact that apart from the first four bits, each following nibble can be part of an instruction or data - depending on the instruction in question. For instance, the opcode 0x00E0 means clear the screen but opcode 0x1234 means jump to address 0x234.
I had to write a parsing system that would map each opcode to a corresponding logical operation. The first part of the problem was how to turn a set of bytes into separate values so that if an opcode contained data, I could get at that data. I could have used binary operators every time but it seemed cleaner to make a class that took in the byte value and exposed the associated nibbles as attributes, like so:
"""
This module defines an opcode class for parsing
raw words into instructions and data
"""classOpcode:"""
This class represents the instructions and data of an opcode
"""def__init__(self,word):"""
This class takes in a 2 byte value/word and parses the bytes
to store them in different attributes for later use
Args:
word: a 2 byte/16 bit value representing an opcode.
"""# We use bitwise AND with a mask to extract specific nibbles.
# a word should be no more than 16 bits
self.word=word&0xFFFF# we just want the most significant bits/nibble
# here so we bitshift right
self.a=(word&0xF000)>>12self.nnn=word&0x0FFFself.nn=word&0x00FFself.n=word&0x000F# Where don't use the lower nibbles, bitshift
# right to get just the raw value
self.x=(word&0x0F00)>>8# Eg. we want 0x4 not 0x40
self.y=(word&0x00F0)>>4def__str__(self):returnhex(self.word)
Pretty simple eh? I wish I could take credit for this one but many CHIP-8 emulators solve the problem in a similar way.
The next issue was how to map an opcode to an operation. Most other emulators I had looked at just used a giant switch statement, which seemed inelegant. Some blog posts suggested that function lookups would be a good idea but I felt that would be hard to test and a bit ugly. I decided to write a class for each opcode that would change the state of the (virtual) cpu as required.
I then wrote a mapper class that would take in the raw byte value of an opcode and return the related operation object. It looks like this:
"""
This module defines a class that handles
mapping a 16 bit opcode value to an operation object
"""frompychip8.operationsimport*frompychip8.opcodeimportOpcodeclassOperationMapper():"""
This class handles mapping a 16 bit opcode
value to an operation object
"""def__init__(self):self._operations={}# opcode 0NNN (call RCA 1802 program) is NOT SUPPORTED!
self._operations[0x00E0]=ClearDisplay()self._operations[0x00EE]=ReturnFromFunction()self._operations[0x1]=Goto()self._operations[0x2]=CallFunction()self._operations[0x3]=SkipIfEqual()self._operations[0x4]=SkipIfNotEqual()self._operations[0x6]=SetX()self._operations[0x7]=AddToX()self._operations[0xA]=SetI()self._operations[0xB]=GotoPlus()self._operations[0xC]=Random()self._operations[0xD]=DrawSprite()self._operations[0x50]=SkipIfXyEqual()self._operations[0x80]=SetXToY()self._operations[0x81]=BitwiseOr()self._operations[0x82]=BitwiseAnd()self._operations[0x83]=BitwiseXor()self._operations[0x84]=AddYToX()self._operations[0x85]=TakeYFromX()self._operations[0x86]=ShiftXRight()self._operations[0x87]=TakeXFromY()self._operations[0x8E]=ShiftXLeft()self._operations[0x90]=SkipIfXyNotEqual()self._operations[0xE9E]=SkipIfKeyPressed()self._operations[0xEA1]=SkipIfKeyNotPressed()self._operations[0xF07]=SetXToDelayTimer()self._operations[0xF0A]=WaitForKeyPress()self._operations[0xF15]=SetDelayTimer()self._operations[0xF18]=SetSoundTimer()self._operations[0xF1E]=AddXToI()self._operations[0xF29]=LoadCharacterAddress()self._operations[0xF33]=SaveXAsBcd()self._operations[0xF55]=SaveRegistersZeroToX()self._operations[0xF65]=LoadRegistersZeroToX()deffind_operation(self,word):"""
This method takes a 16 bit value representing an
opcode and returns the related operation
"""opcode=Opcode(word)# make a key of a + n + n so that 0xA123 becomes 0xA23
twelve_bit_key=int((opcode.a<<8)+opcode.nn)iftwelve_bit_keyinself._operations:returnself._operations[twelve_bit_key]# make a key of a + n so that 0xA123 becomes 0xA3
eight_bit_key=int((opcode.a<<4)+opcode.n)ifeight_bit_keyinself._operations:returnself._operations[eight_bit_key]four_bit_key=opcode.aiffour_bit_keyinself._operations:returnself._operations[four_bit_key]raiseKeyError(f"Opcode {word:#06x} is invalid")
The trick with this is the parsing that happens in find_operation - I try to find the opcodes with the most nibbles that are identifiers first, then I slowly go through to more simple ones that may only use two nibbles and finally check the ones that are only identified by their leading nibble. If an operation can’t be found I throw an exception. This is important as I spent the early period of the project mostly just writing opcodes with no working emulator to run them on. Instead, I wrote several tests to confirm the opcodes did what they said they did and also that the mapper found the expected operation when given an opcode. I also had tests to make sure that invalid codes that should not map to an operation, didn’t.
Writing the unit tests doubled the time it took to write a class for each operation, but the amount of bugs they caught made them invaluable. They also meant that I could be sure that any change I made did not break the functionality of existing code elsewhere. If you want to write your own CHIP-8 emulator I would very much recommend testing your code in a similar fashion.
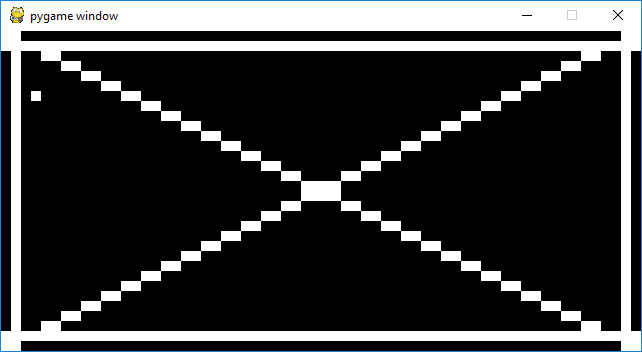
Now I had a way to read binary data from roms, a virtual cpu, and working opcodes. What I needed next was a renderer. Writing a simple renderer in pygame that drew an all black screen and then drew white sprites over that was easy enough, but sadly I hadn’t quite implemented the single draw opcode properly. I figured this out by creating a test pattern shown below:
It didn’t look like this at first as I had incorrectly implemented the opcode. Among other things I had used the raw values in the opcode as the “start drawing at x and y co-ordinates” rather than using the values in the registers they pointed to. Yes, the good old forgot to dereference a pointer error. Sigh.
The good news is that by writing the renderer test it was easier to track down the bug and I soon had the emulator partially working. I found a useful test ROM to confirm that the emulator was working correctly (you can see the documentation for it here) but I was getting strange output like shown below:
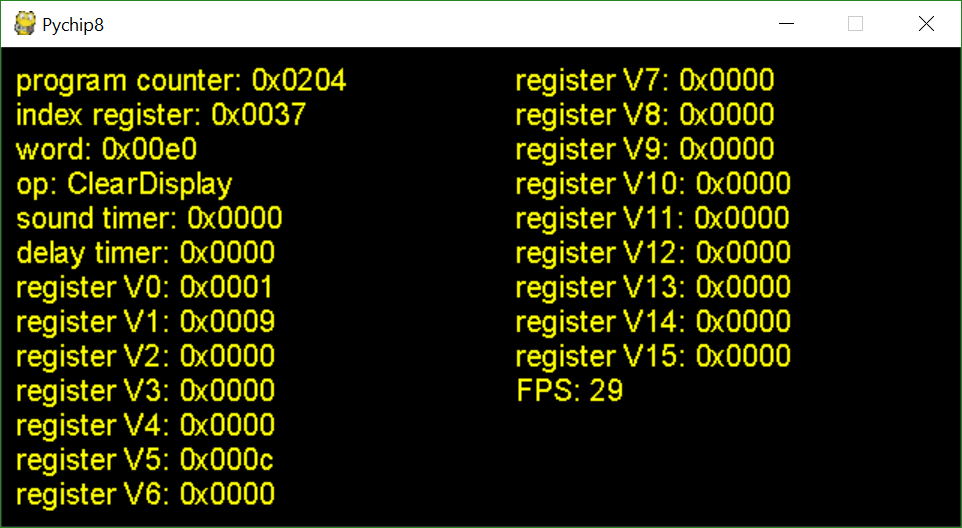
I was scratching my head for a while but after looking at the documentation I could see which opcodes were failing but I wasn’t sure why. To fix this, I had to take a step back and write my own debugger that allowed me to run the program step by step and print all the register values on screen so I could see where things were going wrong. It looks like this:
It took a little time to figure out the simplest way to write a debugger and implement it but it was more than worth the effort. Like my unit tests and the test rom, I consider the debugger a crucial part of building the emulator and it sped fixing errors up immeasurably.
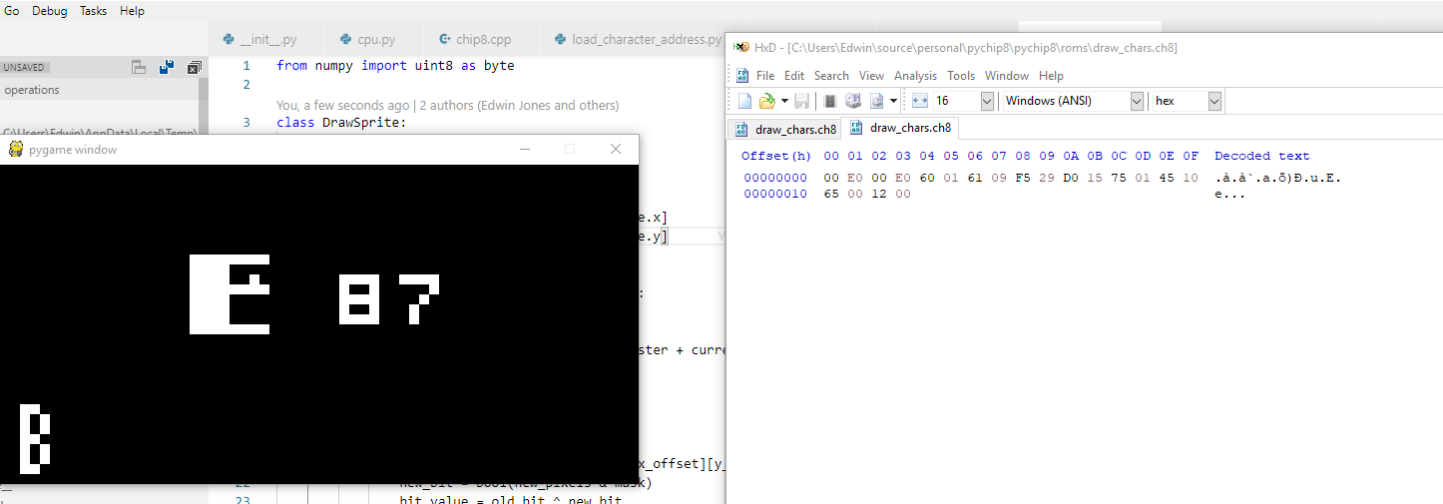
After stepping through each error the test rom threw up I found that the basic font of the CHIP-8 wasn’t working. I hand crafted a fresh test rom byte by byte with a hex editor to print each character stored in the font, then used my debugger to loop through it. It turned out my font loading code was broken and looking at the wrong addresses. Once this was fixed, the test ROM started working. It’s hard to explain how happy just seeing this made me:
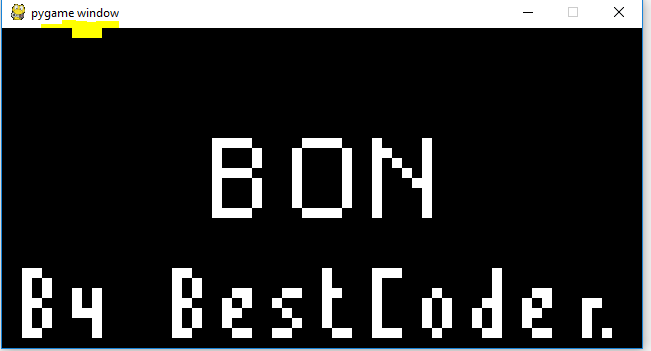
It’s silly, but it meant the emulator was mostly working! In my excitement I immediately booted up a full phat game (space invaders) and was overjoyed to see the awesome title screen run:
Sadly, in my haste I hadn’t actually implemented input or sound yet so I couldn’t move any further than the menu screen. I was also confused as the screen appeared to flicker slightly. This was due to me running my emulator far too slowly (a CHIP-8 runs best at roughly ~500hz and I was running it at 60hz) and the drawing operation being rather slow to begin with. I looked up some footage of other CHIP-8 emulators and when I saw the same oddness I breathed a sigh of relief.
Input was slightly more complicated so I ended up just using the existing pygame api to handle that. Once I put it all together I could finally play space invaders and other CHIP-8 games like pong and tetris. Old and well known they may be but there was something very novel about playing them on a system I had crafted for myself. For reference, this is how my emulator looks playing pong:
I showed off my project to a few people at work and they were pretty awesome in providing feedback and genuine interest. The only downside is they are now egging me on to build a game boy emulator which I am seriously considering doing if I can find the time.
Building this emulator might seem like a simple enough task but it’s one of the biggest projects I’ve done outside of my day job for a long time and was good fun. I had to spend some time planning and reading before coding so I felt this was a nice way to stretch my engineering legs. If you’re interested in emulation even a little bit I would recommend this as a fun project to learn the basics. You can find the source code for my emulator on github.
]]>Dynamo DB for dummies2018-04-18T00:00:00+00:002018-04-18T00:00:00+00:00https://edwinjones.me.uk/dynamodb-for-dummiesI’ve been been working with DynamoDB for a while now. I want to share some of my findings about it’s little quirks with you all as well as summarise my thoughts and learnings about how it works for my own future reference. It’s a really great system for storing per user information and in situations where you don’t particularly want to query across multiple tables at a time. This is going to be quite a high level overview but I’ll try to link more detailed articles as I go so you can research the topics raised here further.
First of all, What is DynamoDB? It’s a data storage system built and provided by Amazon. It’s a NoSQL system which means it doesn’t work like conventional database systems you might be familar with such as Access, MySQL, MariaDB or SQL Server. It has more in common with MongoDB.
The first difference is you can’t host your own DynamoDB server - you have to set it up via Amazon Web Services and access/pay for it via Amazon directly.
The second, larger difference is that it doesn’t store data in the same relational manner you may have used before. The only part you have to define about the schema ahead of time is the primary key, which at its most basic can simply be one field called the Hash or Partition Key. When you define this each record on your table must have a unique instance of this value and you can only select objects directly via this key, or search the entire table for records by other values on table rows. This is known as a table scan and can cost you more money than necessary as Amazon charge for reads, writes and total storage used in DynamoDB. It’s far more efficient for your wallet if searches are optimised and they will be faster as well.
Once you have defined your hash key, each record in the table can be completely different. Let’s imagine I had a table called users that had an integer as the primary key/record identifier. In a normal SQL database I’d also have to define the kind of data I’d want to store for every record - if I wanted to store the user’s name and age I’d have to define that ahead of time like so:
Id (Key)
Name
Age
1
John
16
2
Sarah
22
3
Bob
56
If I wanted to add a new field to one record, say to store a user’s favorite color, I’d have to update the table definition. Depending on my database system I may have to give a default value or even update every existing record.
In DynamoDB things work differently. Each record can have completely different data as long as it has a unique key, like so:
Id (Partition Key)
Name
Age
Favorite Color
1
John
16
Green
2
Blue
3
Bob
56
The concept of a table is completely different. I can insert a record with completely different fields to those that came before it without updating the table definition in any way as long as I include a unique partition key. This is a powerful feature for storing data in a system that is still growing where you are unsure as to what exactly you will need to store in the future. This kind of loosely defined data template storage is known as a document store.
Dynamo tables can be made to be eventually consistent, meaning that reads may not match up exactly to the data in the table at the current moment in time but will always “catch up” eventually. You can also request strong consistency which acts more like a tradition database in that any data returned matches all data that has been entered so far. I prefer to demand strong consistency by default but there are many cases where eventually consistency can be advantageous, especially those where you just need to get large amounts of data out as quickly as possible without worrying about individual records.
In SQL, you might be used to searching on any column in any way. You would expect to be able to search on a non primary key such as Age and sort by it with something like the following query:
SELECT*FROMUSERSWHEREAGE<30ORDERBYAGE
This would return the following data:
Id (Key)
Name
Age
1
John
16
2
Sarah
22
To do this in DynamoDB, I’d have to select every record and then filter them. To get a more performant search I’d need to define a secondary key, known in dynamo as the Range or Sort Key. If you define one of these, each record has to be unique on the Partition Key AND the Sort Key as shown below:
Id (Partition Key)
Name
Age (Sort Key)
Favorite Color
1
John
16
Green
3
10
3
Sarah
56
Black
3
Smith
99
4
Bob
56
Grey
As you can see, we now have records with the same partition key and the same name but each record has a different combination of both. They are also both mandatory if they have been defined. This is known as a composite primary key or hash-range key. We can now sort/query by the sort key but not by any other values, not even the partition key itself unless we want to do an expensive full table scan.
To understand how this works, it’s important to understand how Dynamo stores data under the hood. It stores data in locations per partition key, and then orders everything in that partition by the sort key. Without the partition key you aren’t going to be able to access any data at all. I could however, now search for each item with an Id of 3 and an Age above 10. This would return the following data:
Id (Partition Key)
Name
Age (Sort Key)
Favorite Color
3
Sarah
56
Black
3
Smith
99
Most people however will want to sort and search through their data on more than one field. How can we achieve this? Dynamo provides two options to do do, known as secondary indexes. These are similar to what you may have come across as an index in a sql database but are slightly different.
The first option is known as a Local Secondary Index. This allows you define another sort key that you pair with the same partition key to sort by. You are allowed up to five of these on each table. They always include the sort key from the original table as this is how they link back to the original record(s):
Id (Partition Key)
Name (Sort Key)
Age (Projected Key)
1
John
16
2
Sarah
12
3
Sarah
56
3
John
99
3
John
56
Now we could now search for records with an Id of 3 and the Name ‘John’ which would return the following data:
Id (Partition Key)
Name (Sort Key)
Age (Projected Key)
3
John
99
3
John
56
The limitations of the Local Secondary Index are that they MUST be defined when the table is created and cannot be deleted afterwards so you have to plan ahead to use them. There is also a size limit per partition key of 10 GB so you can’t store too much data under one key. A Local Secondary Index is updated when the main table is, and consumes any throughput or provisioning limits you have set on that table. You can set a local secondary index to be eventually or strongly consistent.
The other kind of index you can create is a Global Secondary Index. They act in most ways like a copy of the original table with a different set of keys. They are charged and provisioned seperately to the original table. You are also allowed 5 of these per table. They always include the primary key(s) from the original table as this is how they link back to the original record(s):
Id (Projected)
Age (Projected)
Name (Partition)
Favorite Color (Sort)
1
11
John
Black
2
42
Joe
Blue
3
55
Sarah
Black
3
27
John
Blue
4
73
John
Grey
We could now search for all records with the name “John” with a favourite color beginning with ‘B’ which would return the following data:
Id (Projected)
Age (Projected)
Name (Partition)
Favorite Color (Sort)
1
11
John
Black
3
27
John
Blue
The primary benefits of a global secondary index are that you can have a completely different partition key to the original table and you do not have to define a range key if you do not want to. You can define them long after you have created a table and delete them at any time.
The downside to them is that global secondary indexes use more resources than local ones, and cost a bit more (but still far less than full table scans). You can only retrieve the columns defined in the global secondary index and cannot ask for columns from the main table like you can with a local secondary index. They are also only eventually consistent, meaning you can not guarantee data you retrieve is completely up to date. Just Eat have a good article on how to use them effectively.
You can also do a few other other neat tricks in dynamo. You can make records expire/be deleted after a set amount of time by defining one column to represent the amount of time to wait before expiry. This is really useful if you just want to store data for a few days or if you want to make sure you don’t use up too much space in dynamo and incur higher costs. Optimistic concurrency is built in - again all you need to do is define a column which holds a version number and dynamo will prevent multiple clients modifying the same record at the same time.
I hope this has helped explain to you the basics of DynamoDB and how to model some of your data! If you would like to learn about it in more detail, I can heartily recommend Amazon’s own documentation. If you have any feedback about my explanation please comment below and let me know.